Outlander Cast is kicking off a new series, “How They Made It,” in which we dive into the food & drink of Outlander. First up, baking sourdough bread at Lallybroch just like Jenny & her crew.
(Note: some of the links on this page can be with affiliates that give me a small commission for my referral at no extra cost to you, and as an Amazon Associate I earn from qualifying purchases.)
Baking through Outlander
I’ll admit it, my love of cooking and baking predates my discovery of Outlander on STARZ. But it is entirely truthful to say that Outlander has led me to so many new and interesting paths, including my current obsession with Scottish food and cooking. Add to that my well-established love of history, and we arrive at this new series “How They Made It,” a look at the food and drink of the Outlander world. Let’s get started, shall we?
Baking bread, then and now
The ingredients to make bread are quite basic—just flour, yeast and water. Coincidentally (or maybe not), those are the basic ingredients to make beer and whisky, but I digress. Today when I get a hankering to bake bread, I go to the market and buy yeast, flour, and away I go. I’m sure Mrs. Fitz and her helpers, or Jenny and the bairns, were adept in making this staple product on a daily basis, but how did they do it? Mrs. Fitz didn’t have a local Whole Foods to pop down to and grab her ingredients. As for Jenny, the flour would have been available as Lallybroch and the surrounding crofts grew wheat and barley, but what about the yeast? Where did that come from? I’m glad you asked!
Yeast actually occurs naturally in the environment, and while the commercial yeast you buy in the store (i.e., baker’s yeast) has been “domesticated,” yeast in the wild varies by location. Long ago people learned to capture the yeast and nurture it, feeding it flour and water to create a bubbly living starter, and then used bits of that starter in their bread. That’s how the cooks at Lallybroch (or Leoch) would have been able to bake bread that rose, soft and fluffy. Otherwise, it’s just a cracker.
Baking Sourdough Bread
Who here loves sourdough bread? Raise your hands…sixty-two…sixty-three…okay, a lot of you. That tangy character of sourdough comes from the yeast that had been captured from the local environment at a point in time; some sourdough starters available today are descended from a starter more than a century old. And as that starter is fed and used, it adapts itself to the local region and climate, creating a bread that is unique. That’s the reason San Francisco sourdough bread is so distinctive. So while I can’t recreate the exact same bread they would have eaten in Scotland in the 1740s, the method is the same.
My sourdough starter is from King Arthur Flour, and I’ve been maintaining it for more than one-and-a-half years. The recipe for Extra-Tangy Sourdough Bread is also from King Arthur Flour. When I first started baking sourdough bread, I had several unsuccessful attempts (they were more like sourdough doorstops than bread), but I finally got the hang of it and now bake it on a semi-regular basis. Below is my well-annotated printed recipe…
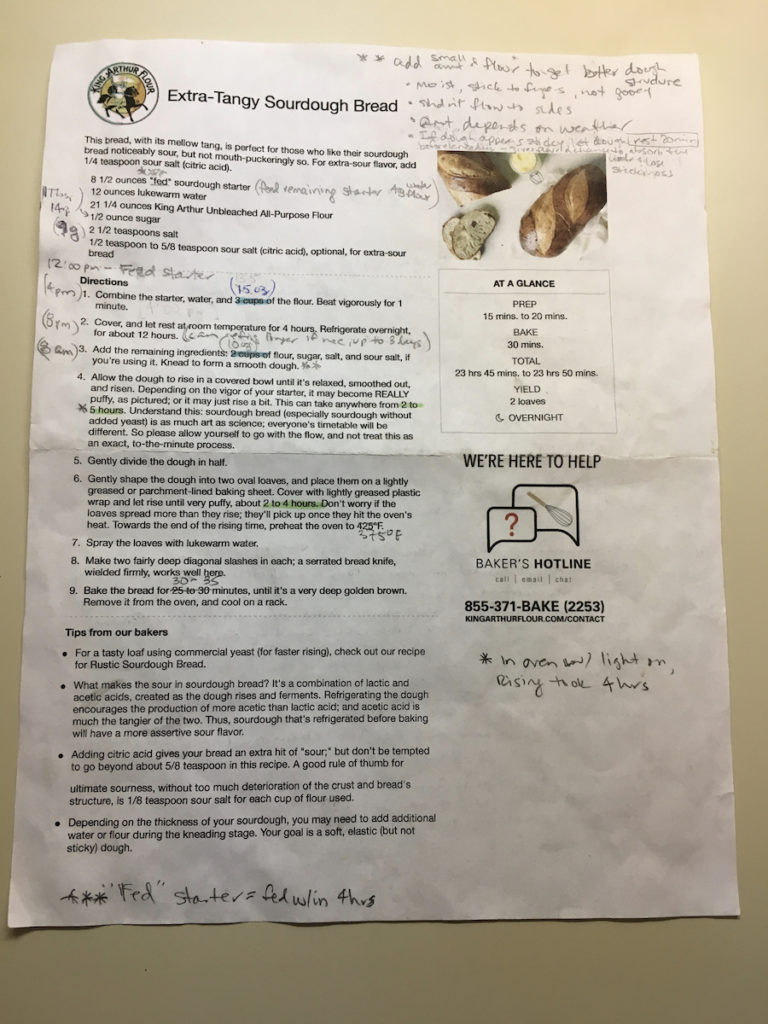
There’s the recipe…and then there are the notes I write all over the recipe. Both are helpful.
Tips and Tricks for baking sourdough bread
Side Note #1: I have a kitchen scale and use it constantly. It’s much more accurate than using volume measurements because the weight of one person’s lightly sifted cup of flour can differ significantly from another’s packed cup of flour. Weighing your ingredients gives much more consistent results, which is why I include the weight measurements in the recipe below. Get a scale…use it, live it, love it.
Side Note #2: The Lallybroch kitchens would have been feeding and using their sourdough starter daily, so it would constantly be ready for use. However, in my kitchen I bake sourdough bread every couple of weeks, so I feed my starter weekly and refrigerate it between uses. The act of feeding sourdough starter is a topic unto itself, as is what to do with the “discard,” i.e., the starter that you take out before feeding the rest (if you don’t discard some of the starter, it’ll grow to the point it will take over a small city). I don’t like to waste anything and have come up with lots of uses for the unfed starter, like Sourdough Spice Cake and Buttery Sourdough Biscuits. Jenny would approve, I think!

Combine these items into fluffy sourdough bread? No problem! (Yes, the decorations help the process.)

Mix the dough in the morning (after letting the initial mixture rest overnight), then watch it grow…and grow…
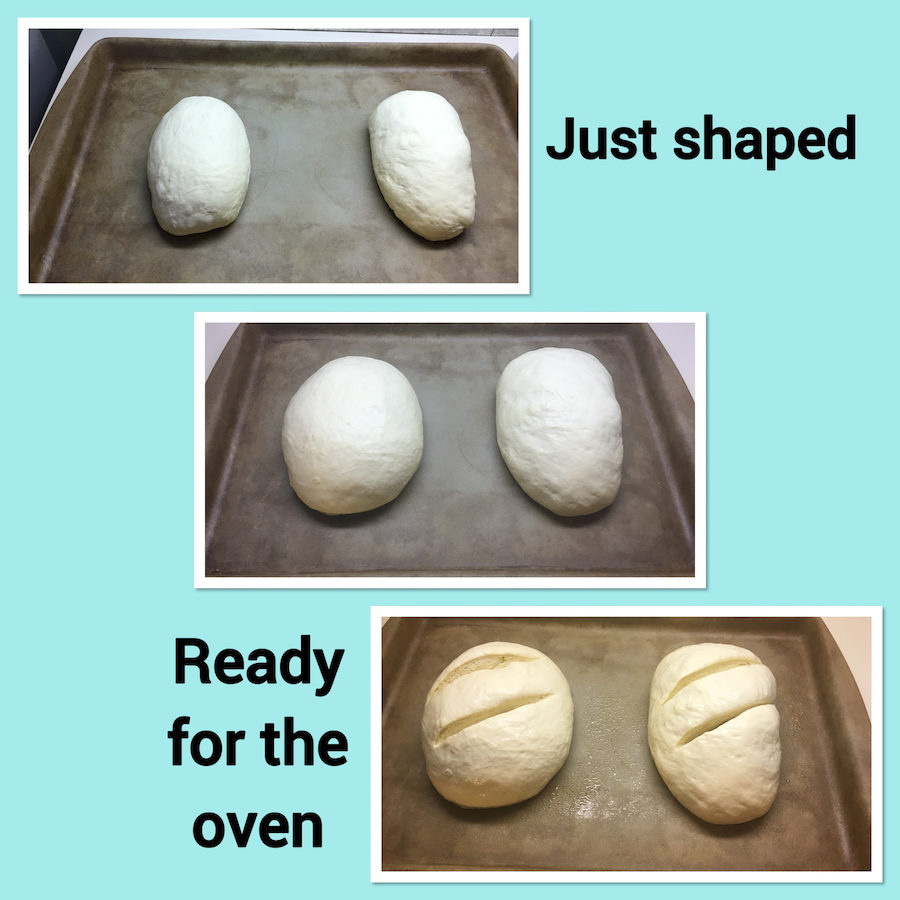
The proofing step…let the dough rest 2 hours after shaping, then splash, slash, and put in the oven.
A few more sourdough notes
- The amount of flour and water you need to make a smooth, slightly sticky dough will vary based on your local weather conditions that day. Boston (where I’m based) is generally humid, so I need more flour to make my dough feel right. You’ll need to experiment to find what works best for you.
- If you’re counting the timeline, you’ll notice that it takes about 1 ½ days to make the bread from start to finish. Just make sure you give yourself ample time to let the dough rest and rise.
- This bread takes some practice to get right. Don’t be discouraged if it doesn’t rise at first…that door needed to be propped open somehow.
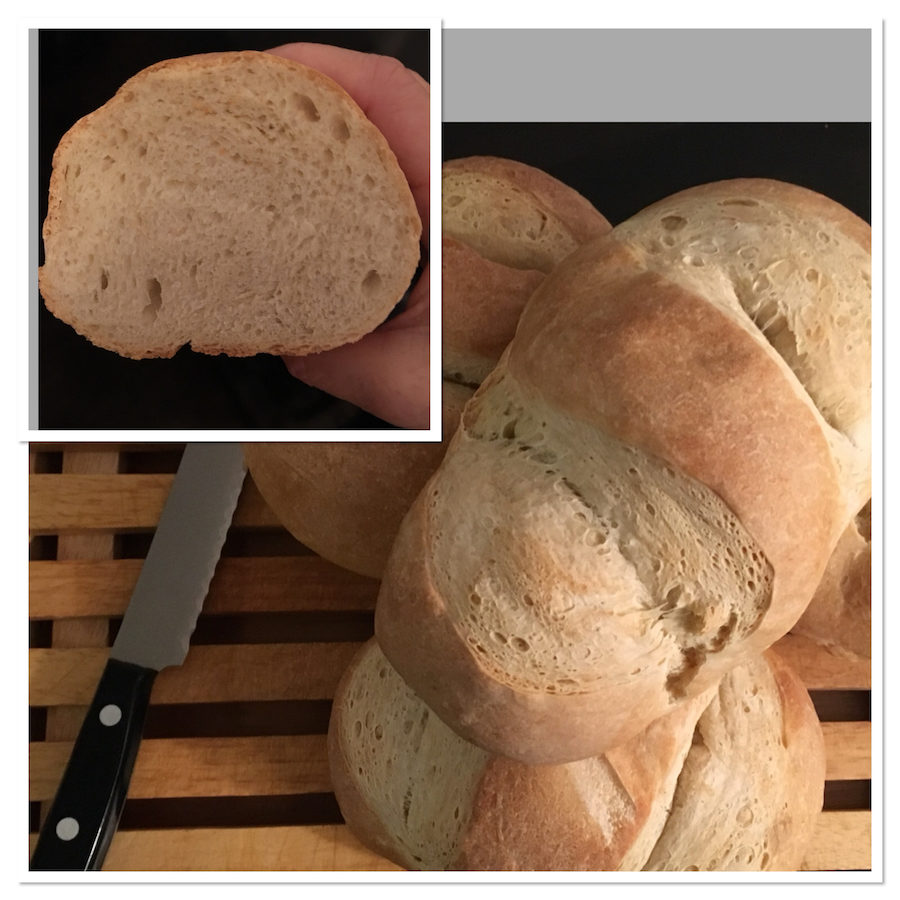
The finished loaves are fluffy with a lovely tangy aroma and taste…yummmmm
Like with most cooking, the amount of work that goes into a dish is so much more involved than eating it. Can you imagine having to bake bread every day for all those Highlanders? No wonder Mrs. Fitz had so many helpers, just to keep up. Baking sourdough bread feels like an accomplishment…I’ll take that, and I hope you will, too!
Do you have any specific dishes you’ve seen on the show (or read in the books) that you’d like me to research? I’m open to suggestions. I’d also welcome any Outlander-related recipes you’d like to share that I can make.
This can be a team effort…Go Clan!
Recipes using sourdough starter discard
When you maintain a sourdough starter, you have a dilemma…what to do with your sourdough starter discard? I’ve got lots of suggestions for sweet and savory ways to use your fed sourdough starter and sourdough starter discard. Here are a few to try.
- Buttery Sourdough Biscuits
- Multigrain Sourdough Bread
- Sourdough Spice Cake
- Sourdough Bagels
- Homemade Sourdough Pretzels
- Sourdough English Muffins
- Sourdough Focaccia Bread with Rosemary
- Glazed Chocolate Chip Sourdough Banana Bread
- Sourdough Pumpkin Cake
- Old-Fashioned Sourdough Gingerbread
- Sourdough Shortcrust Pastry
- Extra Tangy Sourdough Bread – Here’s the recipe to make authentic sourdough bread!
Extra-Tangy Sourdough Bread
Tangy homemade sourdough bread, made with your own sourdough starter, gives you that that wonderful sour flavor you want, direct from your kitchen!
Adapted from King Arthur Flour
- 1 cup sourdough starter (fed, i.e. starter that is bubbling and ready to use (8 oz, 240g))
- 1½ cups water (lukewarm, 100° – 110°F (12 oz, 340g))
- 5¾ cups all-purpose flour (divided, see Recipe Notes (25 oz, 708g))
- 2½ tsp salt
- 1 Tbsp granulated sugar
-
Combine the starter, water, and 3½ cups (15 oz, 425g) of the flour, measuring the flour with a kitchen scale. Beat vigorously for 1 minute.
-
Cover, and let this flour mixture rest at room temperature for 4 hours (you'll want to re-feed your sourdough starter at the same time), then refrigerate it for at least 12 hours. The longer the mixture sits, the tangier it becomes…you can refrigerate the started dough up to 3 days, although 2 days gives a good amount of flavor.
-
When you're ready to continue, add the remaining 2¼ cups (10 oz, 284g) flour, sugar, and salt. Using a stand mixer fitted with a dough hook, knead the dough to form a smooth dough.
-
Transfer the dough to a lightly oiled covered bowl and allow it to rise in a warm place until it’s light and airy, with visible gas bubbles. Depending on how active your starter is, this may take up to 4-6 hours. I let it rise in an oven with the light on…the bulb produces enough heat to create a warm environment, and the dough is usually ready in about 4 hours.
-
Gently divide the dough in half. I divide my dough into quarters to make four mini loaves…that size is enough for my husband and I to eat over a couple of days.
-
Gently shape the dough into two (or four) rounds or oval loaves, and place them on two half sheet baking pans lined with a Silpat or parchment paper. Cover with lightly greased plastic wrap and let rise until very puffy, about 2 to 4 hours (it can go longer; give them sufficient time to become noticeably puffy). Don’t worry if the loaves spread more than they rise; they’ll pick up once they hit the oven’s heat. Towards the end of the rising time, preheat the oven to 425°F, and put a small pan with 1 cup of boiling water at the bottom of the oven (this creates a steamy environment that sourdough loves).
-
Slash the loaves. If you’ve made round loaves, try one slash across the center, and a second slash perpendicular to the first (like a plus sign), or slash in the pattern of your choice. For oval loaves, two to three diagonal slashes are fine. Make the slashes fairly deep; a serrated bread knife, wielded firmly, works well here.
-
Bake the bread for 25 to 30 minutes, until it’s a very deep golden brown. I bake my loaves for 15 minutes, then rotate the pans from one rack to another, then bake for another 10-15 minutes. Remove the loaves from the oven, and cool on a rack.
-
Store bread, loosely wrapped in plastic wrap, for several days at room temperature; freeze, well wrapped in plastic wrap, for longer storage.
The amount of flour and water you need to make a smooth, slightly sticky dough will vary based on your local weather conditions that day. You’ll need to experiment to find what works best for you.
If you’re counting the timeline, you’ll notice that it takes about 1-1/2 days to make the bread from start to finish. Just make sure you give yourself ample time to let the dough rest and rise.
This bread takes some practice to get right. Don’t be discouraged if it doesn’t rise at first…that door needed to be propped open somehow.
2/2019: I’ve updated the recipe to raise the baking temperature back to 425°F, reduced the cooking time to 25-30 minutes, and place a pan with 1 cup of boiling water at the bottom of the oven to create a steamy environment…all these changes from my original post [350°F, 30-35 minutes, spray loaves with water] makes for a nice crusty brown loaf. Score!
Did you make this recipe? Please share your pictures with the world on your social media…tag @outlandercast (on Instagram and Twitter) and use the hashtag #howtheymadeitoutlander. I can’t wait to see your creations!
Discovering Outlander after Season 1 first aired, Tammy quickly went down the rabbit-hole on social media and podcasts and found a world of like-minded fans who not only tolerated her obsession, but encouraged the madness! She combined her Outlander-inspired interest for scotch whisky with her continuing passion for baking and storytelling in her blog, Scotch & Scones…Explorations in a glass and in the oven. Joining the staff of Outlander Cast as the resident baker has brought Tammy full circle, from a podcast fan to a contributing writer. You can follow her on Twitter, Instagram, and Pinterest at @scotch_scones, and find her on Facebook at @scotchandsconesblog.


A friend gave me a rising tip year ago, to place the dough in the bowl on top of the tv with the tv on and it created just the right warmth for the bread to rise. Nowadays that is not so easy with thin screens, but with creative use of shelving it can be done.
Interesting idea…I would think that depends where your TV is located. Mine is near windows that get very cold this time of year, so it wouldn’t work for me. I have dough rise in an oven with the bulb turned on, then there aren’t any drafts and the bowl is out of the way. BTW – there are proofing boxes you can buy (King Arthur Flour has one).
Sourdough contains not only yeast but lactobacilli. The lactobacilli are what gives it that sour taste.
Another tip for rising bread dough: microwave a cup of water until boiling (about 90 seconds). Put the cup of water in the corner of your microwave and then the covered bowl of dough. Keep the door closed until the dough is done rising.
Catherine, you’re right of course about the lactobacilli. The longer you let the dough rest during the first rise, the more sour taste will develop. The trick is to put the dough in the refrigerator for up to 3 days…that retards the rising and develops the flavor. When you’re ready to proceed, just let the dough come to room temperature for an hour or two, then shape, proof, and bake as before.
How do you start the starter sour dough bread recipe before these steps?
Sandra, there are many recipes online on creating a sourdough starter (there’s a link below), but really the best way is to get a starter that’s already started (I know, that sounds silly!). I got my starter from King Arthur Flour, but if you have a friend with sourdough starter already going, ask for some of the discard…then you just have to maintain it.
Here’s a recipe to create your own starter: https://www.kingarthurflour.com/recipes/sourdough-starter-recipe
Here’s how to feed and maintain your starter: https://www.kingarthurflour.com/recipes/feeding-and-maintaining-your-sourdough-starter-recipe
Let me know how it goes. Good luck!
Help, I’m trying to make this Outlander sourdough bread. I really like the gram measurements because most recipies out there with king arthur flour just have volume measurements and I want to be exact.
I’ve tried making this a couple if times but something isnt right. I follow the directions in step 1 and 2 very closely… but on step 3 I find the dough is WAY too thick and dry to mix with the dough hook and stand mixer. I HAVE to add water but dont know how much to add… I probably add too little because I’m afraid of over watering it. Does anyone else do that on step 3 and how do u know how much to add? One difference may be that the starter I’m using along with the flour is whole wheat flour because I read somewhere that the bacteria like something in it more so it gives it an even more sour taste. But not having much experience with this… I dont know if it’s the flour making the dough so dry. I dont let the dough dry out in step 2… and only go for 12 hours in the fridge with the dough covered with a wet paper towel. Please help.
Hi Glenn,
I’m sorry that you’re having trouble with the recipe. I believe your suspicions about using whole wheat flour in your starter are correct…that type of flour really sucks up water, so it’s not surprising that you have to add more. The thing is, you’re going to have to judge how much water to add on your own, and the humidity of the day will also have an effect. My suggestion is to start adding a tablespoon or two and see if you can produce a smooth dough. If it’s not enough, add another two tablespoons. Keep going until you have that smooth dough that slowly bounces back when you press in on it.
As an aside, I have a recipe for challah that I’d been using for years when I lived in California. When we moved to Massachusetts, all of a sudden that tried-and-true recipe was WAY to wet, and I had to significantly cut back on the amount of water I added and also add more flour during the kneading process. I couldn’t understand why this recipe was suddenly misbehaving, but there it was. The moral of this story is that your local factors matter, be it the type of flour you’re using, the weather that day, etc. Be forgiving of the recipe and be willing to adapt if necessary.
One last point, the sour taste in sourdough is produced by the lactic acid fermentation during the initial long rest in the refrigerator. You can let that mixture rest for up to 36 hours before proceeding with step 3…the longer it rests, the more sour the dough will taste. If you want even more sour flavor, King Arthur Flour has a sour salt product that you can add to your dough (https://shop.kingarthurflour.com/items/citric-acid-sour-salt).
I hope this helps, and if not, please reach out again…I’m here to help as best I can!
Happy baking!
I made four smaller loaves and they look great. Will give them a try in the morning
Thanks for sharing the recipe
I’m glad you liked the recipe! Thanks for sharing 😉
Sunday morning and tried a loaf of my bread – so so good. Definitely a keeper recipe.
Of note while they didn’t “rise” too much they did “spread” after shaping. I think it was how I formed my four loaves so next time will make them more round vs oval in height ( if that makes any sense).
Also wanted to say that I left my dough in the fridge for two days so nice and SD tangy which is great and all well worth the “elapsed” time this recipe takes with so little “effort”.
I think I read you can freeze them so I wrapped 2 well in plastic wrap and placed in freezer bags. Just my husband and I so we won’t get through them all that fast. One is wrapped and ready to give to my neighbors to enjoy.
Thanks again for sharing this great recipe
Hi Deb, retarding the rise of the dough over two days definitely helps develop more of that sourdough flavor, so well done there. I tend to shape my dough into four tight rounds which keeps tension in the dough to help them rise more. Finally, freezing the extra loaves is how I make the loaves last longer, wrapped in plastic as you did. Good job and thanks for sharing your experiences! 🙂
Hi Again
So made this for the 5th time and followed your suggestion to make a “tight” round loaf in a hope it would rise more
It actually “spread” more than before and didn’t rise much at all. Still tasted great but mire the height of biscotti than bread.
Not sure what happened this tome but will try it one more time and see if it works out better
Hi Deb, Thanks for checking back in. The elasticity of your dough can change based on the environmental conditions in your kitchen that day, especially when baking on more humid days. Did the dough seem more “wet” or “loose” to you? You want the dough to spring back quickly when you press your finger into it (this is before the first rise).
Also, forming a tight ball means pulling the dough around front to back around the edges, then rolling the whole thing around on your work surface to seal the bottom. If that’s hard to picture, you can see the technique (albeit in miniature) on the video for Sourdough Dinner Rolls (https://www.scotchandscones.com/sourdough-dinner-rolls/). It’s after the first rise when I’m shaping the rolls themselves.
I hope these tips help. Bread baking is an art more than a science, it might take a while to know exactly what works for you. Keep trying, let me know how it goes, and happy baking!